
Home:
Grafting Tips:
TAMU Grafting:
Fruit Trees:
Citrus Trees:
Around the
yard:
Useful stuff:
Our Edible Landscaping:
Talbert Farms:
18,000 visitors since the beginning
Visitors since 20Feb05

Home Fruit Production-T-Budding Citrus
Julian W. Sauls, Ph.D.
Professor and Extension Horticulturist
Texas Cooperative Extension
August 1, 2001
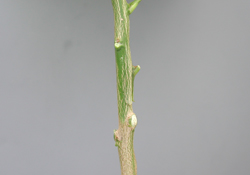
A side view of the inserted bud (Image 18) shows mostly the bark of the stock, with the bud, its attendant thorn, the leaf base and a little of the bark of the bud piece.
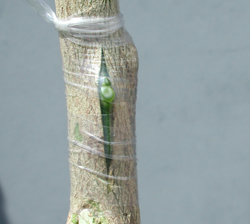
Start wrapping the bud below the incision, making several turns around the stock until the entire bud and incision are covered, finishing with the end of the tape tucked beneath the last turn (Image 19). During wrapping, maintain firm pressure on the tape, but don't stretch it so hard that it breaks. If the tape breaks, remove it and start over with a new strip, using a little less pull.
Beginners will often put two or even three buds on a stock in hopes of increasing the odds of success. Since good technique has better than 98 percent success, multiple buds will not overcome poor technique. It would be more useful to practice slicing buds from a budstick until you can consistently cut them like the one in Image 15. Even then, save the unused budsticks until after unwrapping--just in case you need to rebud.
|
18. Side view of the inserted bud. |
19. Bud wrapped with polyethylene tape. |
Forcing and Aftercare
After 12 to 14 days, healing and union should have occurred, so remove the tape. The easiest removal is to simply make a vertical cut through it on the backside of the stock away from the bud, then slip it off. You can also cut it at the tuck and unwind it.
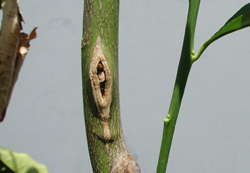
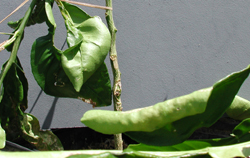
If your technique was somewhat lacking or if this is just one of those one or two percent that simply don't take, the bud will be mostly brown or blackish (Image 20), and may just look rotted. In this case, select another spot on the stock and rebud it. A live bud will still be as green (Image 21) as it was when you inserted it two weeks earlier. The small stub of the cutoff leaf petiole will have turned yellow and it will readily fall off, if it didn't come off during unwrapping.
|
20. Bud failure. |
21. Live bud ready to be forced. |
BuddingPg4.html