
Home:
Grafting Tips:
TAMU Grafting:
Fruit Trees:
Citrus Trees:
Around the
yard:
Useful stuff:
Our Edible Landscaping:
Talbert Farms:
18,000 visitors since the beginning
Visitors since 20Feb05

Home Fruit Production-T-Budding Citrus
Julian W. Sauls, Ph.D.
Professor and Extension Horticulturist
Texas Cooperative Extension
August 1, 2001
|
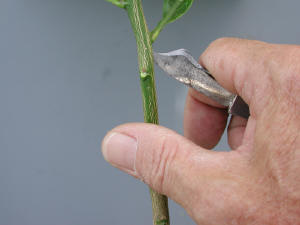
Preparing the stock Unless local conditions warrant budding very high on the rootstock, about six inches above ground should be adequate. In the area to be budded, carefully clip off all leaves, thorns and side twigs. For optimal success, the area where the bud is to be inserted should be fairly straight with about an inch or so between two remaining leaf bases. This distinction will become clear as you look at the next five images. Image 5 is a side view showing the relatively shallow depth of the point of the budding knife as it starts to make the vertical part of the T-incision. The bark is quite thin and very soft, so a sharp knife easily penetrates and cuts the bark with very little pressure. There is no reason to cut into the wood--with practice, you can "feel" the knife tip as it penetrates the bark and makes contact with the wood. |
5. Making the vertical cut |
| Images 6, 7 and 8 show the progression of the horizontal cut at the bottom of the vertical one. Note that the cutting edge of the blade is angled upward sharply, probably at about 45 degrees. To start the cut, place the blade edge at the left side of the vertical cut as shown in Image 6, press it firmly but lightly into the bark (again, with practice, you can "feel" when the blade penetrates the bark). Maintaining the same light pressure and angle of the blade, "walk" the blade across the stock (do not use a sawing motion!). |
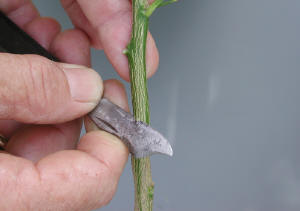 6. Beginning the horizontal cut. |
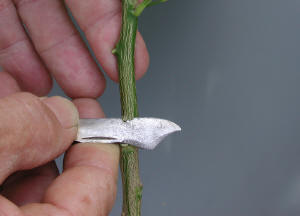 7. Middle of the horizontal cut. |
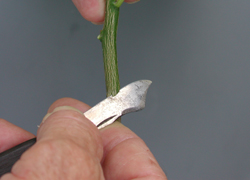
Note the position of the thumb and forefinger in each image, since their position shifts to the right as the cut is completed. In Image 6, the wrist is cocked or bent backward, it is nearly straight in Image 7 and it is slightly curled inward in Image 8--solely by moving the wrist and forearm slightly to the right from beginning to end of the cut. Also, note how the knife edge lifts up the bark during this cut--that is why the blade edge is angled sharply upward. As you examine the completed incision in Image 9, notice that the bark flaps at the bottom of the inverted T are still raised from the stock. These raised flaps provide a guide for easier insertion of the bud.
|
8. Finish of the horizontal cut. |
9. Completed inverted-T incision. |

BuddingPg2.html